- All products
- Trending
-
Shop by Category
- Acrylic displays
- Brochure holders
- Notice boards & Corkboards
- A frames & Pavement signs
- Poster & Sign frames
- Glass display showcases
- iPad stands
- Clip frames & Snapframes
- Poster stands
- Queue & Crowd barriers
- Shopline store fixtures
- Exhibition displays
- Hospitality industry displays
- Charging stations
- TV stands & Digital signage
- Display & Artist easels stands
- Lecterns & Podiums
- Museums displays & Gallery displays
- Safety range
- Poster light boxes & Displays
- Paper display furniture
- Sit stand desks
- Menu blackboards
- Flag banners & Event flags
- Outdoor cigarette bins
- Whiteboards
- Retractable banners
- Sign shop supplies
- Real estate signs
- Digital signage solutions
- Church & Community signs
- Office & Corporate supplies
- Window displays
- Outdoor displays & Signage
- Pos signs / Ticket holders
- Hardware & Accessories
- Hand sanitising stations
- Cable hanging systems
- Educational displays
- Chalkboards & Marker boards
- Business support essentials
- Custom print service
- Specials
- Customer service
How to Add, Remove, and Adjust Accessories on Modular Gambie Poster Stands
07/10/2025
Share the Post:


Modular Gambie Poster Stands are versatile information displays used across various locations, including retail stores, exhibition halls, universities, museums, and more. These displays can hold accessories such as clip frames, brochure holders, and posters, allowing businesses to customise their stands according to promotional needs. Follow the step-by-step instructions below to add, remove, and adjust accessories efficiently.
Step-by-Step Instructions
Step 1: Post Assembly
- Attach the post to the base using the two bolts provided.
- Use the hex key included in the package to tighten the bolts.
- Note: The pole is made of aluminum—do not overtighten the bolts.
Step 2a: Adding a Clip Frame
- Slide the clip frame down the channel in the pole.
- Flip open the top of the bottom clip to position the frame.
- Tighten the screws from the front to secure the frame at the desired height.
Step 2b: Adding a Brochure Holder
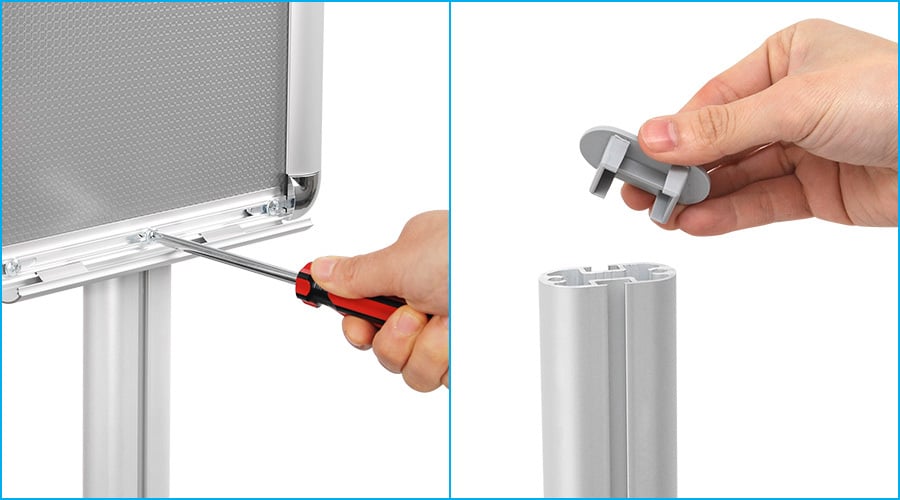
- Slide the brochure holder down the channel in the pole.
- Using a screwdriver, tighten the screws from the front to secure the holder at the desired height.
Removing Accessories
- Loosen the screws from the front using the appropriate tool.
- Slide the accessory (clip frame or brochure holder) out of the channel.
- If necessary, remove the screws and connectors completely.
Adjusting Accessory Height
- Loosen the screws slightly to allow movement.
- Slide the accessory up or down along the pole’s channel to the new desired height.
- Tighten the screws securely to lock the accessory in place.
By following these instructions, you can easily customise your Modular Gambie Poster Stand to suit your business needs.
![]()